Serious Dog Travel Gear For Durable Interior Protection
Most “durable dog travel gear” fails in predictable ways. It shifts off-center, it starts to hammock in the middle, it lets moisture creep through seams, or it turns into a hair-and-grit trap that gets harder to clean every month.
This guide helps you diagnose what’s actually happening in your vehicle and fix the biggest failure points first. You do not need to buy everything. You do need a repeatable way to tell whether your current setup is working.
Two-Minute Diagnosis
Run these three quick checks once. They turn vague “it’s annoying” feelings into measurable outcomes you can act on.
- Stays-Centered Test: align the cover edge to a seat seam and take a photo. Re-check after two normal trips. Action rule: if the edge moves more than 1 inch, you need better anchoring or anti-slip before you need more coverage.
- Does-It-Hammock Test: lay a straight object across the bench span (a yardstick, level, or flat board). Measure the dip at center. Action rule: if the center dip is about 1 inch or more under your dog’s typical load, you are likely to see sliding, bracing, and grit pooling.
- Moisture Transfer Test: after a wet ride, place a dry paper towel under the cover in the “wet zone” for 10 minutes. Action rule: if the towel comes back damp, prioritize a true barrier layer and a faster dry-out routine.
Once you know which test you fail, you can fix the right layer. If you want a single base layer that tends to stay flatter under paws and makes cleanup easier when your results say “structure needed,” the product referenced most often in our support fit help is the Whisker Bark dog car seat cover.
Is Your Setup Decorative Or Protective?
“Protective” gear solves at least two of the three problems below: movement, moisture, abrasion. Decorative layers usually solve only “looks covered.”
- Movement: the surface stays centered and does not hammock over time.
- Moisture: wet fur does not soak through into foam, seams, or carpet zones.
- Abrasion: repeated entry, claws, and hardware do not chew up the surface or your interior.
What Actually Breaks First In Real Use
Most failures are not dramatic rips. They are slow geometry changes that make the back seat feel unstable or messy.
- Center pocket formation: the bench span starts to dip and pull dogs inward.
- Strap creep: straps settle and loosen, so the surface stops staying centered.
- Edge drop toward the footwell: the front edge droops and dogs start bracing.
- Seam seep: moisture finds the path of least resistance and lingers in stitched zones.
- Hair-and-grit embedding: textured fabrics trap debris, making each cleanup harder.
What Works Even If You Don’t Buy Ours
If your tests show you mainly need “less mess and less sliding,” these fixes improve almost any setup.
- Add a grippy underlayer: a thin anti-slip liner under the cover can reduce sideways movement on leather and smooth cloth.
- Use a towel strategy for wet rides: put a dedicated “wet dog towel” on top of the cover for the ride home, then remove it to dry. This keeps moisture from sitting in seams.
- Protect the doors early: door protectors matter more than most people think because scratching becomes a habit fast once it starts.
- Retension once, not constantly: tighten straps after the first two trips, then only when your stays-centered test shows movement.
- Rinse-and-dry routine after beach or mud: a quick rinse plus full dry-out prevents grit from grinding into stitching over time.
The Three Forces That Destroy Car Interiors
Most owners are fighting the same three forces, whether they call it “durability” or “I can’t keep my car clean.”
Weight And Movement
Big dogs create dynamic load. They jump in, shift position, and brace during braking. If your setup relies on fabric tension alone, it can gradually hammock and start sliding off-center.
Moisture And Contaminants
“Water-resistant” and “waterproof” are not the same claim. Waterproofness is often discussed using hydrostatic pressure concepts, where a fabric’s resistance is tested under increasing water pressure in a standardized way (for example, ISO 811 hydrostatic pressure testing). ISO 811 is one reference point for how water penetration resistance is defined and measured.
In plain English, this is why “beading” can still fail: hydrostatic head describes how much water pressure a fabric can withstand before water pushes through. This hydrostatic head explainer is a helpful way to understand why seams and time-under-wetness matter.
If you want the “industry language” version, hydrostatic pressure methods are also used in the textile world (for example AATCC TM127 for water resistance under hydrostatic pressure). You do not need lab data to benefit from the concept. You just need to know what to prioritize when your moisture transfer test fails.
Abrasion And Friction
Claws, harness hardware, and repeated entry and exit create abrasion. Abrasion resistance is also something industries test with standardized methods, including Taber abrasion approaches (for example, ASTM D3884) and Martindale-style abrasion concepts used in fabric evaluation. This Martindale overview gives context for what “abrasion testing” means at a high level.
Durability Comparison: What Changes Over Time
This table uses neutral categories so you can map what you own to what typically changes with repeated use.
| Aspect | Fabric-Only Covers | Structured Base Covers |
|---|---|---|
| Stays Centered | More likely to shift as straps and fabric settle | More likely to stay aligned when the base resists movement |
| Doesn’t Hammock | Center span can dip over time under repeated load | More likely to keep a flatter riding surface |
| Coated Fabric Vs Membrane Barrier | Coatings can repel splashes but may seep at seams over time | Barrier layers tend to reduce transfer when time-under-wetness increases |
| Cleanup Reality | Folds can trap hair and grit, making resets slower | Flatter surfaces are usually easier to wipe and air out |
How We Evaluate Durability In Support Fit Help
We do not diagnose dogs or vehicles. We help owners troubleshoot fit and setup so the back seat stays usable. When someone says “it isn’t working,” these are the first checks we run because they predict the failure mode quickly.
- Bench span and footwell drop: wide benches and deep drops magnify hammock behavior.
- Headrest geometry and strap angle: strap paths determine whether the cover stays centered or creeps.
- Buckle access and daily usability: if buckles are hard to reach, the setup fails in real life.
- Seat material: slick leather often needs a grippy underlayer to prevent sideways movement.
Our internal rubric is simple: Stability (stays centered, doesn’t hammock), Barrier (reduces moisture transfer), Anchors (stays tight), Cleanup (easy wipe + air-out routine).
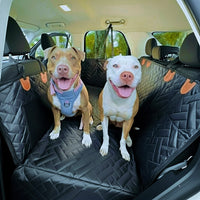
One Real Example: Wet Lab After A Beach Trip
A common pattern we see is the “wet Lab problem.” The first failure is usually not a tear. It’s moisture plus grit: water sits long enough to seep at stitched zones, sand grinds into seams, and the cover starts shifting as the surface gets heavier and slicker.
- What failed first: damp underside after rides, grit in seam edges, and more sideways movement on the return trip.
- What fixed it: towel-on-top for wet rides, a quick shake-out before re-entry, a grippy underlayer to stay centered, and a faster dry-out after the trip.
- When to upgrade: if your moisture transfer test keeps failing even with a towel strategy, prioritize a stronger barrier layer.
Cleaning, Longevity, And Replacement Reality
Durability is easier to own when you avoid “rare deep cleans” and use frequent light resets instead. Two internal guides that help set expectations are how to clean a dog seat cover and when to replace your dog seat cover.
Replacement is usually the right call when straps will not stay tight, the surface stays deformed after unloading, or the setup can’t stay centered even after you add grip and retension correctly.
Final Thoughts: Durable Protection Is A System
A durable setup is not one product. It’s a repeatable outcome: stays centered, doesn’t hammock, reduces moisture transfer, and cleans up quickly enough that you keep doing it.
If your diagnosis says you need a more stable foundation layer, the Whisker Bark dog seat cover with a hard bottom and waterproof build is designed for real travel mess and heavy paws. You can review the current specs on the Whisker Bark Hard Bottom Dog Seat Cover.
Share