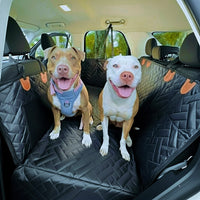
When to Replace Your Dog Seat Cover: Signs It’s Time for an Upgrade
Between muddy paws, sharp nails, and daily rides, seat covers wear out in predictable ways. The real cost is not the cover itself. It is the time you spend vacuuming hair out of seams, wiping damp seats, and re-tightening straps that still slide on every turn.
This guide helps you determine whether your current dog seat cover is still effective. You will run three quick checks, then choose the next step: reinstall, repair, or replace.
Quick Summary: Tests And Next Actions
- Drift photo check: if the cover keeps shifting after one careful reinstall, plan to replace.
- Paper towel moisture check: if any dampness appears after 2 minutes (repeat once to confirm), treat the water barrier as failed.
- Seam and hardware inspection: if straps, buckles, or anchor loops are cracked or torn, replace.
Why Seat Covers Fail Early
Most early failures come from the same culprits. Knowing them helps you extend the life of the next cover and avoid repeating the same problem.
- Grit in seams: sand and dirt work like sandpaper as your dog shifts and pivots.
- Repeated wet use without full drying: trapped moisture drives odor and can weaken coatings over time.
- Heat and sun exposure: prolonged heat can speed up breakdown of waterproof layers and stiffen fabrics.
- Loose installation: drift causes constant rubbing and bunching, which accelerates seam wear.
- High-stress entry: big jump-ins and twist-outs can pull anchors loose and stress strap stitching.
Three At-Home Tests That Make The Decision Objective
You do not need special tools. Use your phone camera, a paper towel, and two minutes of patience.
Test 1: Drift Photo Check
This test tells you whether the cover is staying anchored under normal driving.
- Install the cover and tighten it.
- Pick one reference point you can photograph consistently, like a seat seam near the door-side edge.
- Take a clear photo where the cover edge meets that seam.
- Do two brief drives with normal turns and stops.
- Take the same photo again and compare.
Decision rule: If the cover keeps drifting after one careful reinstall (see the checklist below) and a retighten early in the week, replacement is usually less frustrating than constant adjustments.
Test 2: Paper Towel Moisture Check
This test tells you whether the cover still blocks wet coats, spills, and muddy rides.
- Place a dry paper towel under the cover in a spot that often gets wet.
- Pour a small amount of water on top of the cover.
- Let it sit for 2 minutes.
- Lift the cover and check the paper towel.
- Repeat once in a second spot if you want to confirm the result.
Decision rule: If you see any dampness after 2 minutes on either attempt, treat the water barrier as unreliable for wet rides.
Test 3: Seam, Strap, And Buckle Inspection
Most “sudden failures” show warning signs first.
- Seams: look for fraying, split stitching, or raised fuzzy seam edges at the front edge and centerline.
- Straps: check for thinning, tearing, or straps that slip and will not hold tension.
- Buckles and anchor loops: look for cracks, bending, or loose stitching at attachment points.
Decision rule: If straps, buckles, or anchor loops are damaged, replacement is the safer move. Attachment failures tend to get worse fast.
Reinstall Checklist If Your Cover Is Drifting
Do this once before you decide a cover is “bad.” Many drift problems are install problems.
- Re-seat anchors: push anchors deep into the seat crease so they resist upward pull.
- Center the cover: align it so it is not pulled toward one door.
- Tighten evenly: tighten left and right straps in small alternating steps.
- Retighten early: check tension after the first day of use and again after a few more drives.
Replace Or Repair Decision Tree
- If the paper towel test fails: replace. Water barrier failure is rarely a durable repair.
- If drift keeps returning: reinstall once. If the pattern persists, replace or upgrade attachment features.
- If seams are fraying but the barrier holds: you may get limited extra life with seam reinforcement, but plan to replace soon.
- If straps or buckles are damaged: replace. Hardware failures reduce stability quickly.
- If odor returns after cleaning and full drying: treat it as trapped residue. You may need replacement if it rebounds quickly.
Old Cover Vs Healthy Cover
| What You Check | Worn Cover | Healthy Cover |
|---|---|---|
| Water Barrier | Paper towel shows dampness after 2 minutes | Paper towel stays dry after 2 minutes |
| Stability | Drift and bunching keeps returning after reinstall | Stays aligned with only minor settling |
| Seams | Fraying, gaps, split stitching | Seams look tight and even |
| Straps And Hardware | Cracking, tearing, slipping straps | Hardware holds tension consistently |
| Odor After Drying | Odor rebounds quickly after cleaning and drying | Smell stays neutral after drying |
Maintenance That Extends Cover Life
These routines target the failure modes that shorten lifespan: grit abrasion, trapped moisture, and drift.
- Vacuum seams for 60 to 90 seconds: focus on the front edge and centerline where grit collects.
- Dry after wet rides: aim for fully dry the same day. Do not store damp.
- Wash gently: cold water and air drying is often easier on waterproof layers than heat drying.
- Check straps monthly: re-seat anchors and confirm straps still hold tension.
Travel Safety Reminder
A seat cover protects upholstery and can help your dog feel steadier underfoot, but it is not a restraint system. For a plain-language overview of safe pet travel, including how restraint reduces distraction for the driver, see the AVMA’s guidance on pets in vehicles. If you are shopping for a harness specifically, the Center for Pet Safety harness test results can help you compare options that have been evaluated by an independent testing organization.
In practical terms, aim for a harness that fits snugly without rubbing, clip to the harness connection point rather than a collar, and keep the tether short enough to prevent climbing into the front while still allowing your dog to sit and lie down.
Practical Restraint Checklist
- Harness fit: snug without restricting breathing; check for rubbing at chest and armpits.
- Tether length: short enough to prevent climbing into the front, long enough for sitting and lying down.
- Clip point: attach to the designated harness restraint point, not a collar.
- Carrier placement: secure so it cannot slide; keep airflow and visibility in mind for calmer rides.
Final Thoughts
Replace a seat cover when it fails one of the three job requirements: it will not stay anchored, it no longer blocks moisture, or its seams and hardware are breaking down.
If you want a structured upgrade, the Hard Bottom Dog Seat Cover from Whisker Bark is one option owners choose when they want a flatter surface and stability-focused hardware. For frequent wet rides, consider prioritizing a cover with a clear waterproof layer construction and seam approach that matches your cleaning routine.
Share