Full Interior Protection Setup For Messy Dogs In Cars
Not all dogs create the same level of car chaos. A light shedder on short rides is one thing. A heavy shedder that swims, hikes, and shakes off in the back seat is a different problem, especially when hair packs into seams, grit grinds into fabric, and damp spots never fully dry.
This guide shows how to build a full interior protection setup using a simple diagnosis first, then layered coverage and a repeatable routine. It is not a lab report, and it will not replace vehicle-specific judgment or professional detailing advice.
Two-Minute Diagnosis Before You Buy Anything
Most protection setups fail for three reasons: the seat layer does not stay centered, it hammocks under weight, or moisture gets through seams and stays damp. Run these quick checks first so you fix the right problem.
-
Stays-Centered Test: Align the cover edge to a seat seam or buckle line and take a photo. Recheck after two normal trips.
- If it shifts more than about 1 inch: fix anchoring and anti-slip first. More coverage will still drift.
-
Doesn’t-Hammock Test: Lay a straight object (yardstick, broom handle, level) across the bench span. Measure the dip at the center.
- If the dip is around 1 inch or more: expect more bracing, bunching, and pooling on wet days.
-
Moisture Transfer Test: After a wet ride, place a dry paper towel under the cover in the wettest zone for 10 minutes.
- If the towel shows damp transfer: prioritize a true barrier layer and faster drying, not thicker padding.
The Three Mess Profiles That Ruin Car Interiors
Most “keep your car clean with dogs” advice fails because it treats every dog the same. Identify your dog’s mess profile, then build protection in layers.
Mess Profile Selector
| Mess Profile | What You Notice | Where It Spreads | Protection Priority |
|---|---|---|---|
| Heavy Shedder | Hair on clothes after rides, hair in seams, constant lint rolling | Seat seams, carpet edges, vents, headliner over time | Contain hair at the source with a full-coverage seat layer |
| Muddy Dog | Grit on seats, sand in cracks, dirt tracks in the footwells | Footwells, seat creases, door panels, cargo trim | Block grit and reduce pooling with a stable, easy-clean base |
| Swimming Dog | Wet coat, shake-off spray, musty smell if moisture sits | Seat seams, stitching lines, floor mats, door pockets | Use a waterproof barrier and door protection for spray zones |
What Works Everytime
Before you change gear, lock in the basics. These fixes usually make the biggest difference for the least cost.
- Anti-slip underlayer: if your seat layer slides on leather or vinyl, add a thin grippy liner underneath.
- Two-towel strategy: one towel for the coat, one for paws, stored where you can reach them at the door.
- Retension rule: re-tension straps after the first two trips, then check weekly until the setup stays centered.
- Rinse-and-dry habit: quick rinse when possible and crack windows after wet rides to help damp zones dry faster.
- Door-panel protection: block the first claw contacts during entry before scratches become a habit.
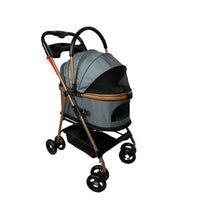
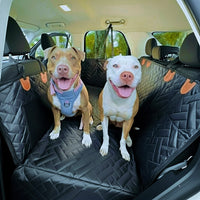
Core Protection Layer: The Backseat Or Cargo Area
The back seat is where most interiors fail first. It takes the most claw traffic, the most hair load, and the biggest shake-off events after parks, hikes, and swim days. If the seat layer fails, mess spreads outward into footwells, doors, and trim.
When a seat layer hammocks under weight, low points form. Low points encourage pooling and make wipe-downs slower because grit and moisture collect where the cover folds and bunches. If you are comparing styles, this internal guide explains tradeoffs: hard-bottom vs soft-bottom seat covers.
Moisture protection is also easy to misunderstand. “Beading” can still allow slow leak-through, especially at seams, under pressure. Waterproofing is often discussed using hydrostatic head testing concepts. A plain-English explainer is here: hydrostatic head testing.
Door Panels, Footwells, And Side Impact Zones
Most owners protect the seat and then wonder why the car still looks messy. The spread is usually sideways and downward.
- Door panels: shake-off spray, muddy sides, and claws during entry
- Footwell gaps: the drop zone where grit falls and grinds into carpet
- Side flaps and seat edges: splash zones for swimmers and kid-and-dog backseats
Where Dirt Actually Spreads
| Mess Source | Where It Ends Up | What Helps |
|---|---|---|
| Shake-Off After Water Or Mud | Door panels, windows, seat edges, center console splash zone | Door coverage plus a seat layer that stays centered and flatter |
| Grit On Paws | Footwells, seat seams, carpet edges, under-seat tracks | Paw-wipe routine plus reduced footwell exposure |
| Loose Hair | Seat stitching lines, carpet, vents, upward drift into headliner | Full seat coverage that traps hair before airflow spreads it |
Managing Hair Before It Spreads
The best setup for shedding dogs is less about vacuuming harder and more about stopping hair at the source. Once hair packs into seams and carpet edges, cleanup becomes a repeating project.
Two internal guides worth bookmarking:
Wet Dog Protocol Before The Dog Gets In
Waterproof gear buys you margin. It does not replace a routine. Reduce the initial water load before the dog sits down.
- Create a shake-off zone: pause outside the car for a controlled shake.
- Stage towels first: one for coat, one for paws.
- Wipe rear paws first: rear paws usually track the most mud and water into the seat area.
- Quick coat pass: belly, chest, and legs first.
- Load calmly: predictable routine beats rushing.
For post-ride cleaning routines, this walkthrough helps: how to clean a dog seat cover.
Best Full Interior Protection Setup
Use this as your baseline system, then add or remove pieces based on your mess profile and your diagnosis results.
- Seat or cargo protection layer that stays centered and does not hammock easily
- Door-panel protection for shake-off spray and entry claws
- Waterproof barrier in the wet zones if your moisture transfer test fails
- Seatbelt access so you can safely use a harness restraint setup
- Small cleanup kit stored in the car (towels, wipes, small brush, bag for muddy items)
Before Vs After Interior Comparison
| Problem Area | Before A Full System | After A Full System |
|---|---|---|
| Seat Surface | Hair packs into seams, wet coats soak into stitching lines | Mess stays on the protective layer and wipe-downs are faster |
| Footwells | Grit falls into gaps and grinds into carpet | Less debris reaches gaps because routines reduce the drop zone |
| Doors And Side Panels | Shake-off spray, muddy rub marks, and claw contact during entry | Side coverage catches the mess before it hits panels and trim |
Common Mistakes That Still Lead To A Dirty Car
- Using fabrics that hold hair and stay damp instead of releasing cleanly
- Skipping door protection, then chasing streaks and claw scuffs
- Letting wet dogs sit down before paws and belly get a quick wipe
- Waiting too long between cleanings until grit embeds deeper
At some point, replacement is part of keeping the system effective. This guide helps you time that decision: when to replace your dog seat cover.
Final Thoughts: Clean Cars Are Built, Not Maintained
A clean interior is usually the result of two things: a seat layer that stays centered and does not hammock, plus a routine that removes moisture and grit before they spread. Run the diagnosis first, build layers based on your mess profile, and keep the routine simple enough that you repeat it.
If you want the product referenced in this setup, it is here: hard-bottom dog seat cover for messy dogs.
Share