Dog Seat Cover Size Guide: How to Measure for the Perfect Fit
Getting the right size dog seat cover is a measurement problem, not a vehicle-name problem. When you measure the surfaces that actually carry load and then compare those numbers to a cover’s stated dimensions, you prevent the three most common “it doesn’t fit” outcomes: drifting, buckle frustration, and footwell sag.
If you want a quick confirmation for the Whisker Bark seat cover before you measure, use the product page tool: Check My Fit With The Size Fit Checker.
How We Built This Guide
This guide is based on recurring fit and installation patterns we see in product-support conversations and hands-on troubleshooting. It is not a controlled study, and you should always follow your vehicle owner’s manual and any child-seat instructions for your specific car.
For safety-related constraints, we cross-check terminology and “must-not-block” access points against public guidance from NHTSA on seat belt fit and use and car seat installation parts like lower anchors and tether anchors. Your vehicle manual is still the final authority for where your anchors and buckles sit.
Safety And Vehicle Constraints
A seat cover must not block seatbelt latching, belt routing, or child-seat anchor access in any seating position you plan to use. If you cannot buckle cleanly every time, stop and change the setup. Do not improvise around belts, buckles, or child-seat hardware.
If you install a child seat, pay special attention to lower anchors and tether anchors. NHTSA notes that lower anchors sit in the seat bight (the crack between the seat back and bottom), and tether anchors are in specific vehicle locations that vary by model, so you need clear access and correct routing for your installation method.
Start With Root Causes, Not Marketing Terms
Most fit complaints map to a small set of repeatable failure modes. Identify yours first, then choose size and style that solves it.
- Drift and bunching: straps pull at a downward angle, anchors pop out of a shallow crease, or the seat surface is slick.
- Uncovered door-side edges: cover width is too narrow for your usable bench width.
- Sag into the footwell: seat geometry creates a deep drop and the cover behaves like a hammock under load.
- Buckle access problems: buckle slots do not align to your buckle positions, or the cover shifts after tightening.
Measure These Four Things
Use a soft tape measure. Write each number once. If you change the tape angle, you change the number, so keep measurements flat and repeatable.
1. Usable Bench Width
Measure crease-to-crease where the seat bottom meets the door-side bolsters. Do not measure door-to-door and do not include plastic trim.
Why it matters: this is the width that determines whether door-side edges are protected without the flaps riding up and creating drift.
2. Seat Depth
Measure horizontally from the front edge of the bench back to the seat crease where the backrest starts.
Why it matters: if your seat is deeper than the cover’s usable depth, the front edge can lift under paw pressure and start walking forward over time.
3. Backrest Height To The Strap Wrap Zone
Measure from the seat crease up to the lowest point the strap will wrap around the headrest posts or headrest base. Do not measure to the top of the headrest.
Why it matters: your strap wrap zone determines strap angle. Strap angle determines how often you will retighten.
4. Buckle Positions
Note where the buckles sit left-to-right on the bench. If buckles are recessed, also note whether you can reach them easily with two fingers before adding a cover.
Why it matters: a “close enough” size still fails if you cannot latch reliably and quickly.
Decision Recipe
Size selection works when you do it in order and compare your measurements to the cover’s stated specs, not to a vehicle category.
- Pick width first: choose the size whose stated cover width covers your usable bench width.
- Confirm depth: your seat depth should be less than or equal to the cover’s stated depth, or the front edge can lift and drift.
- Confirm strap reach: your backrest height to the strap wrap zone should be compatible with the cover’s backrest panel height plus its strap adjustment range.
- Confirm buckle access: the cover’s buckle slot layout must match your buckle positions so you can latch and unlatch cleanly every time.
How To Read A Cover Spec Sheet
Different brands label dimensions differently. Use this translation so you compare like-to-like.
| Your Measurement | Spec Label You Might See | What To Compare |
|---|---|---|
| Usable Bench Width | Width, Length, Side-to-Side | Must cover your crease-to-crease width without forcing flaps up the bolsters |
| Seat Depth | Depth, Width, Front-to-Back | Your front edge to seat crease should be less than or equal to the cover’s usable depth |
| Backrest To Strap Wrap Zone | Back panel height, Seatback height | Panel height plus strap range must reach your wrap zone without a steep downward pull |
| Buckle Positions | Buckle slots, Belt openings | Slots must land on your buckle locations with enough clearance to latch and release quickly |
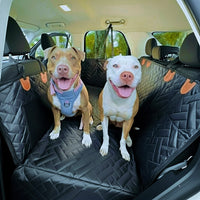
Example Specs For The Whisker Bark Hard-Bottom Cover
If you are checking fit for the Whisker Bark Dog Car Seat Cover with Hard Bottom, the product FAQ lists these dimensions: 54 inches (length), 24.8 inches (width), and 22 inches (height). Always confirm on the product page in case listings update.
- Quick width check: if your usable bench width is greater than the cover’s side-to-side span, you will see exposed door-side edges.
- Quick depth check: if your seat depth is greater than the cover’s usable front-to-back coverage, the front edge is more likely to lift under paws.
- Quick backrest check: if your wrap zone sits higher than the back panel can reach with safe strap angles, you will fight drift and frequent retightening.
One Rule For Door-Edge Coverage
If you want door-edge coverage, choose a size that is about 2 to 4 inches wider than your usable bench width in total, as long as the side flaps lay flat and do not ride up on the bolsters. If side flaps ride up, you often create more drift, not more coverage.
Between Sizes Rule
If you are between sizes, choose the larger size only if buckle access and headrest strap angle still work. Otherwise, choose the smaller size and prioritize a grippier install and even strap tensioning.
Headrest Compatibility Pass-Fail
- ✅ Adjustable headrests with exposed posts (best strap angle and tension)
- ⚠️ Fixed or low headrests (downward strap angle can increase drift and retightening)
- ❌ No rear headrests (consider a different cover style or alternate anchoring approach)
Buckle-Access Tests That Prevent Returns
- Two-finger test: after install, can you reach the buckle with two fingers without digging under fabric?
- 10-second buckle photo test: take a photo of the buckle opening aligned to the buckle right after install, then take the same photo after two normal trips. If the opening shifts off the buckle, you need a different geometry, a different size, or a cover with more stable buckle anchoring.
Worked Examples With Real Numbers
These examples use made-up measurements to show how the comparison works. Your vehicle will be different, so treat these as math practice, not a recommendation.
Example 1: Compact Sedan With Recessed Buckles
- Usable bench width: 49 in
- Seat depth: 20 in
- Backrest to strap wrap zone: 14 in
- Main risk: recessed buckle access
Decision: prioritize a cover with buckle slots that line up cleanly and stays stable after tightening. Even if a larger cover “fits,” shifting fabric can bury buckles over time, which is the failure you feel day-to-day.
Example 2: Mid-Size SUV With Deep Footwell Drop
- Usable bench width: 52 in
- Seat depth: 23 in
- Backrest to strap wrap zone: 16 in
- Main risk: footwell sag and sliding toward center
Decision: choose a style that creates a flatter platform (hard bottom, footwell bridge, or structured base). A hammock that sags can be “the right size” and still feel wrong under load.
Example 3: Full-Size Truck With Wide Bench And Tall Seatback
- Usable bench width: 56 in
- Seat depth: 24 in
- Backrest to strap wrap zone: 18 in
- Main risk: not enough side-to-side span, plus steep strap angles
Decision: width becomes the limiting factor first. If the cover span is less than your usable width, you will see exposed door-side edges and tensioned flaps that creep.
Five-Minute Fit Test With Fixes
Instead of forcing a fit, run these checks once. If the problem persists after one reinstall, change the setup.
- Shove test: press down where paws land and push forward. If it slides enough to expose seat edge or pull buckles out of alignment, re-seat anchors deeper in the seat crease and retighten evenly. If it still slides, add an anti-slip underlay or change style.
- Two-trip drift check: align the cover edge to a seat seam, take a photo, drive two normal trips, then compare. If the edge moves enough to bunch fabric or expose upholstery, reinstall once. If it still drifts, change strap geometry, size, or style.
- Sag check: if the middle dips into the footwell and your dog slides toward the center, consider a hard-bottom, a footwell bridge, or zoning (especially for two dogs).
Problem To Fix Map
| Problem You See | Most Common Root Cause | First Fix | When To Change Size Or Style |
|---|---|---|---|
| Cover Drifts Sideways | Downward strap angle, slick seat surface, anchors popping out | Re-seat anchors deep in the crease, tighten evenly, add grip underlay | If it still drifts after one reinstall and a grip layer, change strap geometry, size, or style |
| Door-Side Edge Exposed | Cover span too narrow for usable bench width | Recheck crease-to-crease width measurement | If measured correctly and edges still show, change size or choose a wider style |
| Buckles Hard To Reach | Recessed buckles, slot layout mismatch, cover shifting after tightening | Reinstall, align slots, verify two-finger access before tightening fully | If openings shift off the buckle after two trips, change geometry, size, or style |
| Dog Slides Toward Center | Footwell sag and hammock-like tension under load | Tighten evenly, reduce slack, add a bridge or base support | If sag persists and your dog braces or slides regularly, change style to a flatter platform or zone dogs |
Seat Types That Break Standard Covers
These seat geometries are common reasons a cover “technically fits” but fails in daily use. Spot them before you buy.
- No rear headrests: straps cannot anchor correctly. What to do: choose an alternate style that anchors elsewhere or use a different layout.
- Integrated or fixed headrests: strap wrap zone sits too low or at the wrong angle. What to do: expect more drift unless the cover supports alternate strap routing.
- Deeply contoured rear seats: side bolsters push flaps up and create lift. What to do: choose a size that matches usable width closely and prioritize grip.
- Recessed buckles or long buckle stalks: buckle access becomes the daily failure point. What to do: confirm slot layout and run the buckle photo test.
- Center armrest pass-through or 60/40 folding needs: a one-piece cover can block daily function. What to do: choose a split-compatible setup or plan for partial folding access.
Printable Measurement Worksheet
Copy and paste this into your notes app before you measure.
- Usable bench width, crease-to-crease: ___
- Seat depth, front edge to seat crease: ___
- Backrest height to strap wrap zone: ___
- Headrests: adjustable / fixed / none
- Buckles: exposed / recessed
- Child-seat anchors in use: none / lower anchors / tether anchor
- Seat split or armrest: 60/40 / center armrest / none / other
- Main goal: edge coverage / buckle access / reduce drift / reduce sag
What This Guide Can Not Solve
- Bench too narrow for two big dogs: no cover can create space. Use zoning (backseat plus cargo), a barrier, or a crate setup.
- Slick leather plus launchy entry: you may need a grip layer and a retighten routine even with the correct size.
- Headrest geometry that forces a downward strap angle: a different cover style or anchoring method is often the better answer.
- Child-seat routing conflicts: if a cover interferes with belt routing or anchor access, prioritize correct child-seat installation per NHTSA guidance and your manuals, then choose a different cover setup.
Final Thoughts
The most reliable fit method is simple: measure crease-to-crease width, confirm depth, confirm strap wrap reach, and verify buckle access. If any one of those fails, you will feel it as drift, buckle frustration, or sag.
If a flatter platform is your priority, the Whisker Bark dog seat cover with a reinforced hard bottom and waterproof 600D Oxford cloth is designed to reduce footwell sag and wipe clean between trips. You can review current dimensions and fit notes on the Whisker Bark Dog Car Seat Cover with Hard Bottom product page.
Share